
Shortcuts
MotiveWave™ provides a number of convenient ways to do common tasks quicker. This section explores some of these options.
Menu Short Cut Keys
You may have noticed already that when displaying a menu, a key combination is displayed on the right hand side for some of the items in that menu. This key combination may be used as a short cut to access that item without using the mouse to show the menu and select the item.
In the example displayed below, the short cut keystroke for accessing the Comment tool is: Ctrl + Shift + T. This means that you can hold down on the Ctrl/command key, Shift and press the T key on the keyboard (all at the same time) to switch your mouse tool to the Comment tool. You may find this to be much faster than using the mouse to select the tools drop down and choose the Comment tool menu item.

You can assign a new shortcut by right clicking on the Shortcut icon on the top right of each component card or right click on the component card and select Shortcut/Assign Shortcut:

Please Note: by convention tool short cuts all have the sequence Ctrl + Shift + <key>. This makes it easier to remember them.
Custom Keyboard Short Cuts
Keyboard short cuts can be customized in the Settings dialog (Configure > Settings from the Console menu bar). Start by unchecking the Use Default option. With this option unchecked, you can search for an action using the Filter bar. Double click on any of the actions (or select and press the Edit button) to assign a keyboard short cut.

From the Edit Shortcut dialog, simply press down on the key sequence that you would like to assign to the action. The key sequence will appear in the grey box (see below).

Mouse Wheel
If your mouse has a wheel, you can use this to perform the following actions on the chart:
Time Shift – Move the graph to the left or right (depending on wheel direction)
Adjust Bar Width – This will effectively zoom the graph in or out
Adjust Vertical Space – Change the space available at the top or bottom of the graph
The default action for the mouse wheel is to time shift when it is moved back or forward. If you hold down on the Alt key and move the mouse wheel, it will adjust the bar width (ie zoom in or out).
This behavior can be adjusted from the Settings dialog (Configure > Settings from the Console menu bar). Click on the General tab, then on the Mouse sub tab.

Mouse Click Options
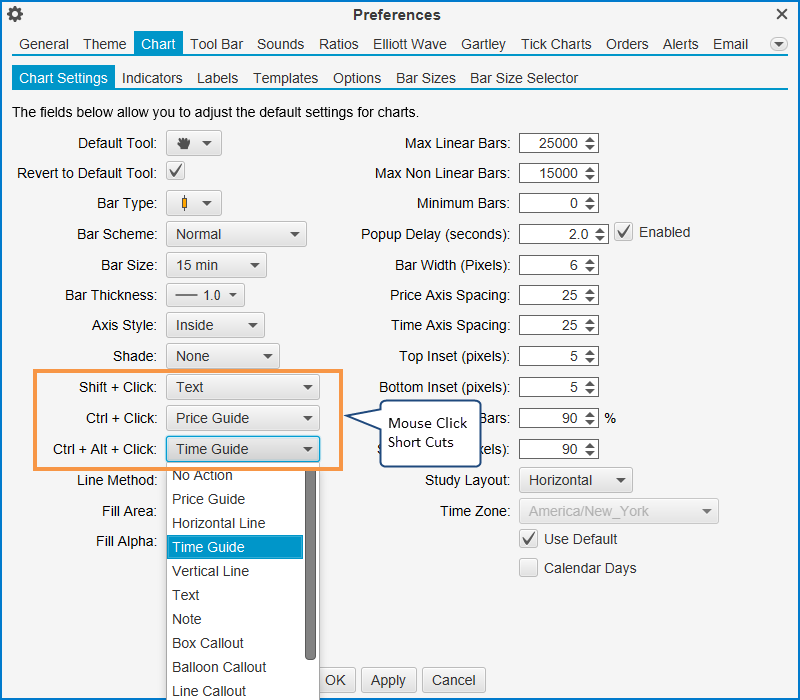
Keyboard modifiers: Shift, Ctrl/command and Ctrl/command + Alt/option when used with a left mouse click can be configured to do specific actions. The default behavior is as follows:
Ctrl + Click – Create a Price Guide at the location of the mouse.
Ctrl + Alt/option + Click – Create a Time Guide at the location of the mouse.
Shift + Click – Creates Text Comment. When you perform this short cut an entry box will appear for you to enter text. Just type your comment and press Enter (or Esc) to create it.
These actions may be configured via the Configure menu > Settings > Chart > Chart > General. The following actions are available to choose from for each click shortcut:
Price Guide – Create a price guide at the mouse location
Horizontal Line – Create a horizontal line at the mouse location (extended left and right)
Time Guide – Create a time guide at the mouse location
Vertical Line – Create a vertical line (extended up and down) at the mouse location
Text – Create a text box to enter text
Note – Create a Note component
Box Callout – Create a Box Callout component
Balloon Callout – Create a Balloon Callout component
Line Callout – Create a Line Callout component
Annotation – Create an Annotation component
Curly Annotation – Create a Curly Annotation component
Erase - Create an Eraser component
Other Shortcuts
The following are some other shortcuts that you may find useful.
Ctrl + Mouse Drag (Copy)
Hold down on the Ctrl/command key and drag a component to create a copy of it. This can be very useful for example to create a line that is parallel to another line. The mouse cursor will change to the following to indicate that you are creating a copy: ![]()

Revert To Default Tool (Space Bar)
When switching to a mouse tool, you can quickly switch back to the default mouse tool (Time Drag Tool) by pressing the Space Bar. This can be more convenient than pressing Ctrl + Shift + D. Alternatively, you can change the behavior of the mouse tools to automatically revert to the default tool when an action is completed. This can be adjusted via the Configure menu > Settings > Chart > Chart > General.

Last updated