Overlay Example

In this section we will create a very simple example called ‘My Moving Average’ that displays an exponential moving average as a path on a plot.

Let’s start by looking at the code for this example:

package study_examples;

import com.motivewave.platform.sdk.common.*;
import com.motivewave.platform.sdk.common.desc.*;
import com.motivewave.platform.sdk.study.*;

/** This simple example displays an exponential moving average. */
@StudyHeader(
 namespace="com.mycompany", 
 id="MY_MA", 
 name="My Moving Average",
 label="My MA",
 desc="This simple example displays an exponential moving average",
 menu="My Studies",
 overlay=true,
 studyOverlay=true)
public class MyMovingAverage extends Study
{
  enum Values { MA };
  
  /** This method initializes the study by doing the following:
      1. Define Settings (Design Time Information)
      2. Define Runtime Information (Label, Path and Exported Value) */
  @Override
  public void initialize(Defaults defaults)
  {
    // Describe the settings that may be configured by the user.
    // Settings may be organized using a combination of tabs and groups.  
    SettingsDescriptor sd = new SettingsDescriptor();
    setSettingsDescriptor(sd);

    SettingTab tab = new SettingTab("General");
    sd.addTab(tab);

    SettingGroup inputs = new SettingGroup("Inputs");
    // Declare the inputs that are used to calculate the moving average.
    // Note: the 'Inputs' class defines several common input keys.
    // You can use any alpha-numeric string that you like.
    inputs.addRow(new InputDescriptor(Inputs.INPUT, "Input", Enums.BarInput.CLOSE));
    inputs.addRow(new IntegerDescriptor(Inputs.PERIOD, "Period", 20, 1, 9999, 1));
    tab.addGroup(inputs);
    
    SettingGroup colors = new SettingGroup("Display");
    // Allow the user to change the settings for the path that will
    // draw the moving average on the plot.  In this case, we are going
    // to use the input key Inputs.PATH
    colors.addRow(new PathDescriptor(Inputs.PATH, "Path", null, 1.0f, null, true, true, false));
    tab.addGroup(colors);
    
    // Describe the runtime settings using a 'StudyDescriptor'
    RuntimeDescriptor desc = new RuntimeDescriptor();
    setRuntimeDescriptor(desc);

    // Describe how to create the label.  The label uses the 
    // 'label' attribute in the StudyHeader (see above) and adds the input values
    // defined below to generate a label.
    desc.setLabelSettings(Inputs.INPUT, Inputs.PERIOD);
    // Exported values can be used to display cursor data
    // as well as provide input parameters for other studies, 
    // generate alerts or scan for study patterns (see study scanner).
    desc.exportValue(new ValueDescriptor(Values.MA, "My MA", new String[] {Inputs.INPUT, Inputs.PERIOD}));
    // MotiveWave will automatically draw a path using the path settings
    // (described above with the key 'Inputs.LINE')  In this case 
    // it will use the values generated in the 'calculate' method
    // and stored in the data series using the key 'Values.MA'
    desc.declarePath(Values.MA, Inputs.PATH);
  }

  /** This method calculates the moving average for the given index in the data series. */
  @Override
  protected void calculate(int index, DataContext ctx)
  {
    // Get the settings as defined by the user in the study dialog
    // getSettings() returns a Settings object that contains all
    // of the settings that were configured by the user.
    Object input = getSettings().getInput(Inputs.INPUT);
    int period = getSettings().getInteger(Inputs.PERIOD);
    
    // In order to calculate the exponential moving average
    // we need at least 'period' points of data
    if (index < period) return; 
    
    // Get access to the data series.  
    // This interface provides access to the historical data as well 
    // as utility methods to make this calculation easier.
    DataSeries series = ctx.getDataSeries();
    
    // This utility method allows us to calculate the Exponential 
    // Moving Average instead of doing this ourselves.
    // The DataSeries interface contains several of these types of methods.
    Double average = series.ema(index, period, input);
    
    // Calculated values are stored in the data series using
    // a key (Values.MA).  The key can be any unique value, but
    // we recommend using an enumeration to organize these within
    // your class.  Notice that in the initialize method we declared
    // a path using this key.
    series.setDouble(index, Values.MA, average);
  }
}

All studies must derive from the base class ‘Study’ (com.motivewave.platform.sdk.study.Study). This class contains a number of methods that we can override (we will look at these in detail later). For the purposes of this example, we will explore the following:

  • StudyHeader

  • initialize method

  • calculate method

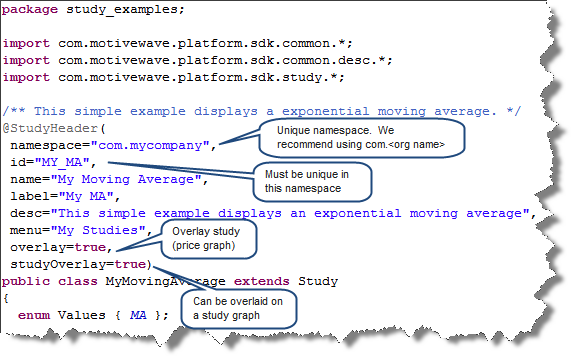
StudyHeader Annotation (@StudyHeader)

All studies must define a study header. This is an annotation that is placed before declaring the class:

There are a number of important items in this header:

  • namespace – this is used to qualify related studies and avoid naming conflicts with studies developed by third parties. It is recommended that you use a form similar to ‘com.<name of your organization>’ Together with the id tag, these form a globally unique identifier for your study

  • id – this identifies your study and must be unique within your namespace

  • name – This is the name of your study and is displayed in the study dialog as well as the study menu

  • label – This is used as part of the study legend (displayed in the top left corner of the plot underneath the plot title). If not specified, the name attribute will be used.

  • desc – This is the description of your study and is displayed in the study dialog

  • menu – Identifies the menu (underneath the Study menu) where this study can be found

  • overlay – If true indicates that this study will be an overlay displayed on another plot

  • studyOverlay – Indicates that this study can be used as an overlay on a study plot.

initialize method

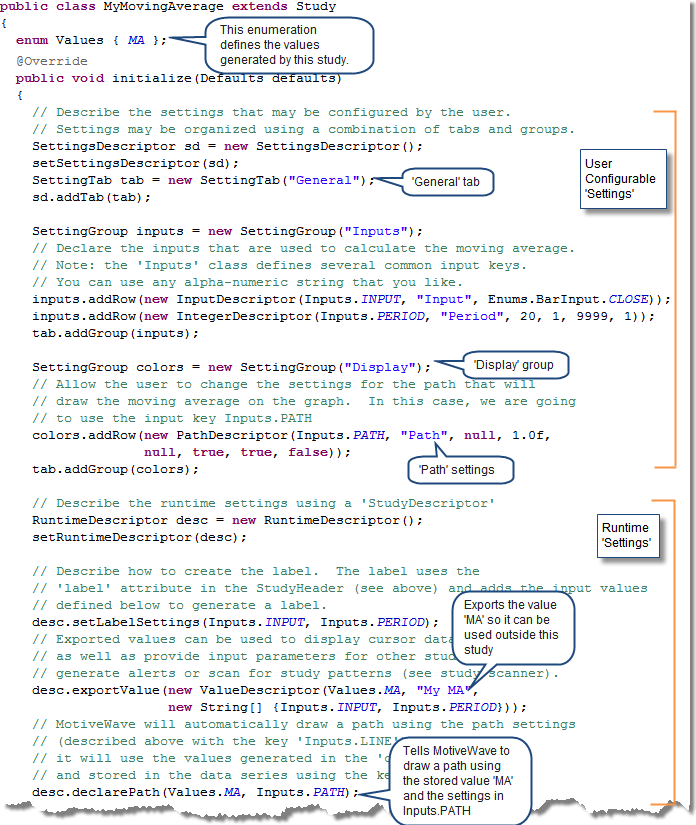
The ‘initialize’ method is used to perform any necessary initialization work when the study is created. This method is given access to system defaults (such as colors or fonts) available through the ‘Defaults’ class (see API documentation for specific details). The most common usage of this method is to do the following:

  1. Describe Design Information (ie: inputs) – The SettingsDescriptor describes settings for the study and how to display this to the user (in the Study Dialog).

  2. Describe Runtime Information – The StudyDescriptor describes information to MotiveWave™ so it knows how to handle this study at runtime (ie label settings, paths, exported values etc).

Design Time Information

In our case, we need two types of inputs in order to calculate our exponential moving average:

  • Input – By default we will use the closing price for the bar (Enums.BarInput.CLOSE), but we will allow the user to choose something different (if they desire).

  • Period – This is the number of bars to look back when computing the average

For convenience, we will also allow the user to modify properties of the ‘Path’ such as the line color, style and weight.

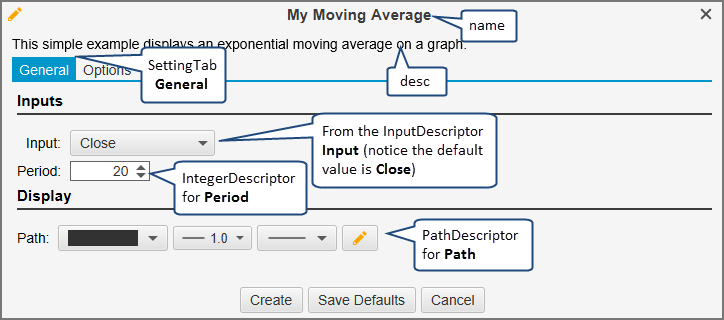
The following diagram illustrates the Study Dialog that is presented to the user when they create or modify our study. Notice how the information described in the StudyHeader and the SettingsDescriptor are used to generate this dialog.

The classes used in this section are available from the package ‘com.motivewave.platform.sdk.common.desc’. There are a number of classes in this package (see API documentation for full details). In this example we are concerned with the following:

  • SettingsDescriptor – This class encapsulates all of the settings

  • SettingTab – Used to organize settings into ‘Tabs’ that are displayed in the Study Dialog

  • SettingGroup – Organizes settings within a tab into logical groups

  • Setting Descriptors – MotiveWave™ has many setting descriptors (base class SettingDescriptor). The ones used in this example are:

    • InputDescriptor – Inputs used to calculate values. Typically these are historical data inputs such as open, high, low or close values, but may also include derived values (such as weighted price) or values generated by other studies.

    • IntegerDescriptor – Describes an integer input value. This can be constrained to a specified range (1 – 9999 in this case)

    • PathDescriptor – Describes how to render the path. In this case the user can choose the line width, style and color

Run Time Information

Run time information is specified using the RuntimeDescriptor. For the purposes of our example, this will include the following:

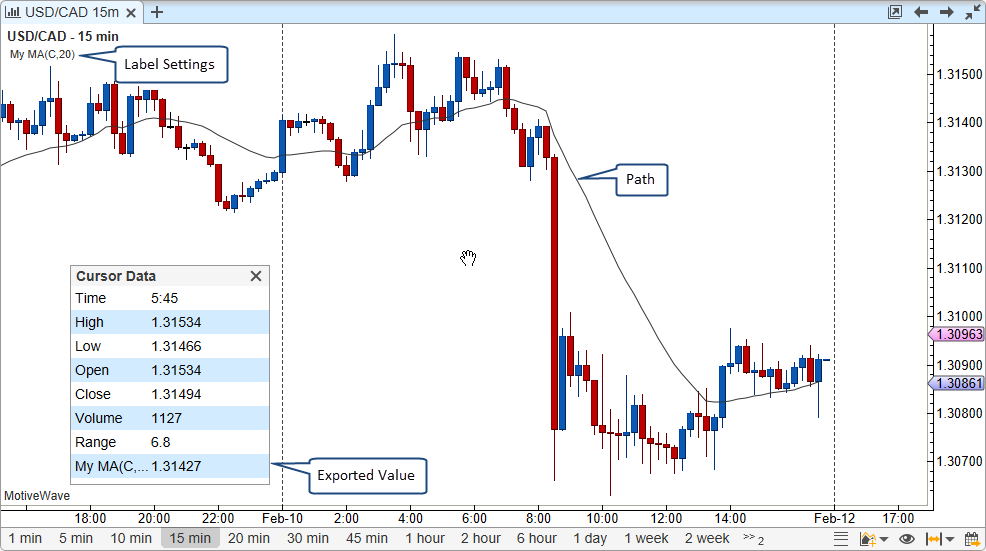
  • Label Settings – Describes how to create and display the label (study legend) for this study. In our case we want the label to include the Input and Period. For example, with an input of CLOSE and a period of 20, the label will look like: ‘My MA(C,20)’

  • Declare Path – Tell MotiveWave™ to create and draw a path using the information created by the PathDescriptor and the values generated by the study

  • Export Value – Exported values may be used for a number of purposes, most notably:

    • Cursor Data – Displaying information in the Cursor Data Window

    • Input for Other Studies – Exported values can be used as input to other studies

    • Input for Alerts – Alerts can be created to be triggered off of study values

    • Study Scan – When creating a study scanner, these exported values can be used to find specific conditions.

The following screenshot displays what our study looks like at Runtime:

calculate method

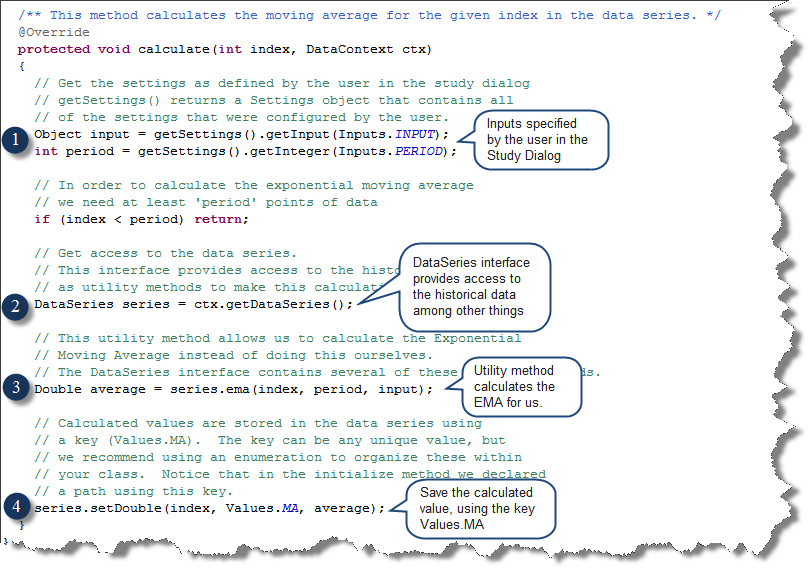
This method is used to calculate the value(s) for a particular bar in the data series (identified by the index parameter). This method is called by the ‘calculateValues’ method for every bar in the data series. Alternatively, you could override the ‘calculateValues’ method if you want to handle the creation of all values for the data series.

In this case we are going to do the following:

  • Retrieve the User Settings – ‘getSettings()’ returns a reference to the Settings object.

  • Get the DataSeries – This is the interface to the historical data and a repository for any values computed by the study. This also contains several utility methods for computing values such as moving averages.

  • Compute the EMA – this is done by calling the utility method ‘ema’ with the input specified by the user.

  • Store the EMA in the data series – This value is stored at the given index using the key: Values.MA

Last updated